Sunday, December 15, 2013

Cute Tag Request

I recently attended a girls weekend with my best friend Tracy.  The whole weekend just scrapbooking and relaxing and having fun at the Oakwood Inn in Grand Bend Ontario.  So beautiful and the food was amazing!!  We met some fantastic ladies and made new friends while we were there.  I had made this tag and had a request to post how I did it so here is the tutorial for everyone to share!  Merry Christmas from Crafty Kat!
This is one of my favorite tags from last year.  I started with the large Scallop Circle from Sizzix and cut one using Whisper White Card stock cut at 4 1/2x 4 1/2.
Next I took a piece of Pool Party cut to 4x4 and ran it through the Big Shot with the polka dot embossing folders.  I tore four pieces of scrap Whisper White card stock and attached it to the bottom of the Pool Party layer.  Tear these pieces towards yourself so that you get a better torn edge look.
Next I took the Pool Party layer with the torn Whisper White pieces attached to it and ran it through the Big Shot using a Circle Bigz die. Attach this layer to the scallop circle layer.
Next I used a two way glue pen to add glue to the top of each of the torn layers and added dazzling diamonds to it.
The next step!  I used scrap Whisper White card stock and stamped 4 of the polka dot stamp from Pennant Parade stamp set from Stampin UP!  I stamped them in Wild Wasabi Ink and punched them out.  Then I stamped two of the Stamp that looks like garland on the tree also in Wild Wasabi ink and attached the "trees" to the right hand side of the tag.
To create the layered tree I folded each of the polk a dot stamped scallop shapes in half and glued the backs to one another and the last ones were glued directly to the tag.  I added a button to the top of the tree and a bit of ribbon to the top.  I also punched a hole and added bakers twine so that the tag could be used as an ornament after the gift was given.!  Any questions please feel free to contact me via craftykatcreations@gmail.com

Glittery Hugs

Kathryne

Friday, December 6, 2013

Tim Holtz Pre Order!!

Yes I know we all LOVE Tim!!!!  And you are going to love what he has in store for us in the new release!

Amazing Tattered Flowers - these guys are big!  Great for decor - layouts, you name it and the greens to go with it!  To die for!
you can Pre- order your very own at www.Craftykatcreations.com and follow the pre-order instructions  by pre ordering you are saving 15% of the regular price AND you get to be the first girl in your craft circle to play with these amazing new must have dies.

You can also check out some creations on the sizzix website or Tim Holtz website.
Here for sizzix or here for the Tim Holtz site .
These dies are shipping in late December but not guaranteed for Christmas - but you never know!

Glittery Hugs
Kathryne

Saturday, November 30, 2013

And We are LIVE!!!

The New Crafty Kat Creations site is LIVE!  And with some amazing Black Friday Deals.

Check it out

www.craftykatcreations.com

Use the code BLACKFRIDAY when you check out 

And be sure to sign up on the website to get all the new updates and specials sent right to your inbox!
New products being listed daily and kits and clubs are coming in the new year!

Glittery Hugs!

Kathryne

Wednesday, October 9, 2013

This is Halloween.......

I have been working on some projects for upcoming craft shows in October and November.  I found the base of this project on Pinterest - my own guilty pleasure! and knew I had to make one!

I made this cute Halloween one and will be holding a Christmas Class to make one of your very own!  

Hope you enjoy this!
 And a little close up
I can think of so many different things to do with these.  Next up Christmas!!  

Glittery Hugs

Kathryne

Wednesday, October 2, 2013

It's a Crafty Kat Giveaway!!!!

I am holding a cool Facebook contest right now .  Leave a comment here on my blog and you get one chance to win, head on over to my Facebook page Crafty Kat Creations  and leave another comment including your e-mail address and you will receive another chance to win!  When I get to 500 likes someone will win 
 everything  here in the picture


Wow I want to win this myself - Look at all the goodies! I will also be drawing a winner at 250 likes for a sampler of ribbon.

Glittery Hugs,

Kathryne


Sunday, September 29, 2013

A Little Fall a Little Spooky

The trees are turning and the nights are getting cooler, but wow we have had some gorgeous days to enjoy so far this fall.  Fall is one of my four favorite times of the year, yup there I finally said!  I just love all the seasons for varying reasons, but I find the change exciting and new and things just take my breath away.

So first up I worked on a fall card.  I wanted to try the salt technique and I think it worked out pretty well!  I love the how the colours blended and mixed and created new colours.  I used Tim Holtz Distress inks a new find for me  -- I know I know I am so late out of the gate - but hey better late then never!!  I did throw in a bit of Cajun Craze to as I wanted to match up the colours within the card.

I stamped the leaves in versa mark and used clear embossing powder  then I sponged the inks onto the card stock and used the resist technique.  After that I sprayed the layer with water and added course salt to the mix -it really made some cool marks and blended the colours a bit more. I think it turned out awesome!.  Next to the Big Shot!!  I used one of the Phrases thinlits and ran it a few time through the Big Shot on Early Espresso.  Added all the layers together then added a flower and brad and the saying and tah dah!  All done!  


Next things got a little spooky in the craft studio.  I love making Halloween cards and this boot was the whole reason I purchased Bootiful Occasions.  I saw a card on Stampin Connection or maybe Pinterest that inspired me to make this card.  I wish I could give the person the proper recognition but I just cannot seem to find the card again!
I changed the card up a bit - I used an extra layer and embossed it with the cobweb embossing folder then added Stampin UP's fabulous new Halloween glitter -LOVE IT~!  but of course it is glitter right ?  So what's not to love.  Next I stamped the awesome Boot with Stazon black ink and the saying was stamped seperately.  I cut my saying off of the stamp and made two stamps from each design so that I could play around with them more freely.  I used a circle punch to punch out the boot and the oval punch to punch out the saying.  Also punched a scalloped oval to mount the saying on from Basic Black card stock.
Next I sponged Whisper White ink onto the cob web from the Big Shot and sponged it with Whisper White ink.  Then used the two way glue pen and added the fabulous Halloween glitter - whoo hooo!  It really made it pop!  I cut some scrap pieces of Tangerine Tango, Wild Wasabi, and Perfect Plum and tore one side of each.  Then I sponged my white pieces that I punched earlier with Perfect Plum Ink and adhered them to the card with tape runner and pop dots to add dimension.
I am going to add some googlie eyes to the boot as well but I was all out tonight  and wanted to get some posting done!  I will post an update tomorrow night after I hit the dollar store in town.  How cute is the this card anyway!  I love everything about it!

Inside I stamped a saying from Wicked Cool and used the spider web from the same set.   I also used the spider web to decorate the back where I put my Stampin UP stamp on and for the envelope because you always need to decorate the envelope right?  


Well that is it for today - I hope you have been inspired to go make a fall or Halloween themed card - and just surprise someone with a card out of the blue!  You will make someones day!  I know where my cards are headed!

Glittery Hugs,

Kathryne

Sunday, September 22, 2013

Release the Shackles and Crafty Your Heart Out

Had such a great and creative weekend.  I got to meet Vicki Gee this weekend!  What an amazingly talented and very cool person!  I she taught be so much about Copics and I was able to be bring a whole new look to this amazing medium I am discovering (finally) .  Yes that means some cool new techniques will be happening here at Crafty Kat in the months to come!  Yaaaa!  Release the shackles and crafty from the heart!

So here is the first card I did with Vicki,  first we did a whole lot of practicing in the morning so things would go smoothly when we created our cards.


The adorable girl in the window was so fun to colour!  I love how she turned out and I am sure my shading will only get better with time, may have to hit my Mom up for some lessons as she paints.  I got to play with flower soft another product I have never used before and wow what a really cool product!  It just brings a whole new dimension to the snow effect.  We used I.O. stamps and dies for the rest of the card - more new fun things to play with!  I can see this design being sent to some of my closest friends this year!.

Next up!  Of course a Snowman card  :o)
How fun is this little guy standing on his head?  He is just so happy that it is snowing in his little snow globe world. The back ground in Midnight Muse is actually a stamp on the blue card stock - I thought this was DSP when I first looked at the card.  The globe itself has a bit of acetate over it to make it more globe like!  Adds just that extra somethin' somethin'!  Again he was coloured with Copic markers pretty cool!
Ewwwwwwwwwwwwww  Creepy! this is such a creepy and cute Halloween scene and making the back ground look was so awesome.  We used Distress Inks on this baby and wow I did not know what I was missing with these things.  Until you get to play with different things you just do not get the hype!.  We used masking and the inks and the ink and water technique to achieve this amazing look.  Love it.  My head is racing with new creations, not sure I will be able to part with this cutie.  


I just love this new monochromatic look taught to me by Kim.  The doll stamps are so cute and the blending and shading is just such a fantastic technique to play with.  You use Distress Ink and a new product with nibs and water to create this cool effect.  These will be great for paper piecing and cards and bookmarks...... you get the idea.
This last card I made a couple of weeks ago - so pretty!! I love blue and white for winter cards.
Stay tuned for more blog posts and tons of new things happening here at Crafty Kat Creations!

Glittery Hugs,

Kathryne

Thursday, August 15, 2013

Steampunk!

I have been looking around the extremely vast crafting universe and oh my oh my the new and exciting things I am finding!!!  I know that most of the things have probably been around for quite awhile but they are new and exciting to me and I am happy to jump on the band wagon!  
Last night I attended a Steampunk class in Komoko at Scrapping Great Deals.  Sheila is a sweatheart and is the owner!  Last night the artist was the amazing Lauren and WOW what that girl can do with paper - such an inspiration!

So she designed this amazing project for us to complete and today I will be tweaking it - I think I need to add some bats flying around the balloons for starters!  Any way here are some pictures of what I did!

 Here is the whole thing -- I think I need to have some bats flying around the balloons as well so I will work on that today
 The Papers are all from Graphic 45 this set is simply amazing!

So there you go my first Halloween Post of the year!

Glittery Hugs

Kathryne

Sunday, August 11, 2013

Flight of a Butterfly....

I am just loving all my lovely little butterflies I cannot get enough of playing with these stamps!!  And of course I am loving the new In Colors for 2013-2015.  I am not sure which one I love the most!


I am really loving this one!  I made this one for a very special family friend for her birthday.
I made the envelope a little different.  I used it as a gift holder too for the cute little key fob I made her to match.
Hope you take some time to add a little craft time to your day.

Glittery Hugs,

Kathryne

Brain Injury Card Class for August

Whew!  I have been a busy busy little crafter but on behind the things secret stuff!  Don't worry you know I cannot keep crafting secrets for long!!  Trust me though this is huge!

This month we did a variety of cards with my Brain Injury Group!  Everyone loved them and of course we were able to make a couple of extras to donate to the Association for use at their many events to thank special people who help out the association time and time again.

The First one just made me smile so I dug out my smile stamp for it!


Yes I know I just cannot get enough of butterflies right now or for the last year!!  I just love them!  My corner rounder is kicking the bucket though so I am going to invest in a corner chomper I think  we shall see!

Next up!  Chalk Talk.  Used the Chalkboard technique and water colour pencils on this one.  And of course it has a matching die for the Big Shot so that makes life easy for everyone.

There is a whole lot of texture going on with this one but it was loved so that is the main thing!  Not completely satisfied with this design but everyone loved it when I got it out so sometimes that happens - something the designer is kind of blah about is a smash hit with the ranks so it does go to show you that you are your own worst critic - lesson learned!  maybe  :o)
Next up... this is fast becoming one of my new Fav stamps! And the members love it too!  Actually they did not realize this was a stamp we used before because we used it in a new way!  The colour just makes me happy it is Calypso Coral!  YUM
This set has a fabulous embossing folder that matches and I used it to emboss the flowers  check it out for this angle

A little of my Crafty Kat Shimmer Spray in Pearl and you have a beautiful simple card.
Cute Little saying and it is a great design for any occasion.

We also started a new tradition for my classes.  Birthday Celebrations!
We had two birthdays for this first week and here are the cards that the lucky gals received as part of the celebration!  
 This is first card was made for R  and she loves music and she is a rocker from way back so I thought a little rock 'star' card would be awesome for her!  Her cake was Strawberry short cake! Yummy!
Next up was C and she has a huge love of cats!  So I made her this adorable little Hello Kitty card complete with animal print embossing to two of the layers.  And she had chocolate fudge for her cake. 
The whole group signed the cards and we all sang happy birthday!  it was fun and everyone seemed to enjoy the special surprise!

Look for some new creations from the Holiday Catalogue coming up shortly!

Glittery Hugs

Kathryne

Wednesday, June 5, 2013

Out With the Old and In with the New

It's here and it's early this year!  Stampin UP! has gone to a new timeline with the New Mini Catalogues and and that meant a change to the big one too!  I am pretty excited about the new items especially the scrumptious new In Colours and the ribbon!  Could not wait to get my hands on them!

Here is my first creation with two of the new stamp sets.  Pool party and Island Indigo are part of the regular line up now!  So exciting because we all know how I love Pool party!  My little piece of Tiffany's in my creations.

 I used the New Stamp set called Wild Flower Meadow  I am already in love with this one! It is hard to see in the picture but in the back ground of this stamp is polka dots!  So adorable.  The base is a regular size base 8 1/2x 5 1/2 scored at 4 1/4 in Island Indifo.  the next layer is pool party and it is embossed with the new Embossing folder also called Wild Flower Meadow!  I wanted to actually use the Coordinations card stock and then sand the embossed part but I was all out of pool party.  I placed this on the card on the debossed side to add a different texture.  I then added another layer of Island Indigo and then Stamped the image on Whisper White.  The greeting is from Label Love and is punched out with the coordinating punch Artisan label punch.   

I have had the honour to be asked to create the invitations for my Son's School for his Grade 8 Graduation.  I feel so honoured that they asked me to take care of this very important task!  I came up with a few ideas but they chose one that goes with the theme.  I will post pictures next week after they have been sent out to the Graduates.

Please make sure you check out the new Catty by clicking the link on the Right side bar or message me to receive your own copy!

Glittery Hugs

Kathryne

Tuesday, May 28, 2013

Spring time Layout

Hello my Crafty friends!  I have been busy busy busy in the craft room playing with tons of new stuff I got in and have been very neglectful of my blog!

I hope this bright and cheery spring layout for the May Making Memories class will help yo forgive me

 This Spring layout is a mixture of Stampin up and Non-Stampin up items, such as Close to My heart, and Pink Paislee.  The Title is Love Blooms in my Garden.  I just loved how all the colours worked together and the whole thing just made me smile.  I have to pick up my pictures to go in this one tomorrow
This is the second page

And here is the first page  and of course my "creative space"  LOL  yup I make a true Creative Mess!

Cannot wait to see what the BIASL members think of the layout!


Glittery Hugs

Kathryne

Sunday, March 3, 2013

Feeling Springy....

Well even though it is FREEZING outside and snowing I am feeling like spring!  I am in Spring cleaning mode and have been slowly getting things re-organized and cleaned out, including the ever present ever increasing INBOX from hell!  If you are new to my blog then you do not know this..  I am horrible about deleting my e-mail, currently in my inbox are over 39,000 email, plus I deleted over 29,000 from files!  And although there is a lot to go through I feel lighter already!
On to some cards!

I saw a few cards similar to this first one on Pintrest and thought I know just the stamp set that might work with this technique.  The absolutely beautiful Papillion Potpourri.  I am not sure why I waited this long to get this stamp set but I cannot put it down.  You can find it on page 115 of the Big Catty!  There are two butterfly punches to match this set one in the Big Catty and one in the New Spring!  Amazing!

This card is made with just one piece of Whisper White Card Stock!  I stamped the butterfly on the Card stock in Melon Mambo, Daffodil Delight, and Tempting Turqoise.   After that I just used my paper snips to cut around the butterflies to create this cool edge on the card. The Sentiment is from the hostess set Happiest Birthday Wishes that you can get for having a get together with friends as part of you hostess rewards!  And don't forget, its Sale-a-bration so this is THE best time of the year to be a hostess!  

The next card I worked on yesterday was designed for my upcoming Spring into Spring class.  Tangerine Tango is the base and the DSP is a retired one from Stampin UP!  The images are from the Stamps of Life with Stephanie Barnard!  Love that lady!  This is a stamp set and die cut in one!  Awesome!  makes creating that much easier.

Hope you enjoyed today's creations

Glittery Hugs,

Kathryne


Friday, March 1, 2013

Easter Card

So today I was busy cleaning and creating in the craft room!  Well mostly cleaning and organizing.  I seem to get in such a creative streak that sometimes I don't get everything back in its place!  
Here is a card I came up with for my upcoming Spring into Spring class.
I really loved the colour combination and it made me feel fresh and clean like spring!

I used the great new Ovals Framlits to create the Easter Egg shape and popped up the second layer to add texture!  I used the amazing little bow maker that I can run through my Big Shot to make the decorative bow on the top.  The embosslits butterflies complete the look and of course a touch of dazzling diamonds


This was a cute card made from the new Umbrella Set from Stampin UP! and the cloud embossing folder!

Notice the ribbon on the umbrella -- that is a piece of the ribbon pack you can get free right now during sale-a-bration!
Love how cute this card turned out! 

glittery hugs

Kathryne

Thursday, February 21, 2013

It's a Double Post Day

As I finished up my first post my Mom called to let me know she needed a couple of cards.  So I got busy making a card I have been thinking about for awhile, but I just got the stamp set in the mail so could only play with it today.

I just thought the umbrellas were so adorable when I saw them and they have to be paired with the awesome new cloud embossing folder!  I have wishing for something like this for quite some time.  So here is cute little shower card I made for my Mom to give some lucky bride.
Here is the inside!  Cute!


Glittery Hugs

Kathryne

Easter! Its early this year! And KITS!!!

I was asked to make some Easter Card for the New Comers Club here in Sarnia.  I worked with this group last year as well and they are a fun fun bunch of girls!   So they requested Easter and I said YIKES!!!  Easter already - and sure enough there is was early this year March 31st so mark your Calendars.

Here is the first card I came up with to do with this group.  Love Love Love the butterfly stamps!  Its so versatile and you can use it for almost any occasion. 

   The base of this card is Whisper White.  The next layer is Wisteria Wonder and Stamped with Perfect Plum and a saying from Delightful Dozen.  The next layer is Whisper White again and I used Versa mark to stamp the Butterfly -- I used a NON-Stampin up stamp here but this would work perfectly with the new Butterfly Stamp in the Spring Catty.  If you don't have yours message me and I will get it out to you asap.  Its a must see!  And its sale-a-bration so more bang for your buck.
The Image was then heat embossed with black embossing powder.  I let that set then used my Stampin Pastels to highlight the embossed image -- Stunning!  Then of course a little dazzling diamonds are a must.  I added some organza ribbon to the layers.  The Edge punch is non-stampin up but is perfect for this card.  I hope the ladies will enjoy making this one! 

Also I would like to introduce  Crafty Kat Kits!  Watch the website soon for this card to be available in your own at home kit.  And the very first Crafty Kat Scrapbooking Kit as well!   Available for purchase Monday!

Have a crafty night!

Glittery Hugs,

Kathryne


Friday, February 8, 2013

Love is in the Air......

Ahhhh its February the month of Love and Chocolate!  Yummmmy.  All of my classes this month will be featuring a yummy chocolate treat for guests - just an extra little thank you for all your support!  So if you want to host your own party  message me and lets get a date set!

On to the main attraction- Valentines Day Cards!   I love making cards with a love theme and all the glitter and glitz of Valentines day just makes me smile.

So my first group this month was my amazing ladies with the Brain Injury Association - a love creating with these gals- they do their own thing and make the cards their own and I love to see how they work their creations from my template.  Of course there are some that just follow the guidelines but I love the free spirit when someone makes my creation their own too!

First up is my "chocolate" card.   The base is Regal Rose and then a layer of Early Espresso run through the Big Shot with a heart embossing folder.  Next is a Die Cut heart from the More Amore DSP from Stampin UP!  Love this paper so versatile.  I then stamped the outline heart form Hearts a Flutter and cut with the matching Edgelits dies Hearts a Flutter.  I used the single Valentines Promotional stamp as well.  The whole thing was spritzed with Blushing Bride Smooch Spritz to add a little smoochie to your card. Add a little rhinestone bling and write a sonnet inside.

Next up we went a little Non-traditional for this card,  Some people chose to keep it valentines related others made it into a birthday card and still others a thank you -- it works for all of them!  The base is Always Artichoke, and the images where stamped on Very Vanilla -- I used some Close to my Heart DSP and matching cardstock for the edge on the DSP which was created with Stampin UP's pinking heart edge punch  -- one of my favs!.  I used the hearts edgelits to cut out the heart image with the Big Shot and the Banner was fussy cut out.  Added a Pearl for an extra touch and some dazzling diamonds to some of the greenery on the DSP and Heart.  Simply beautiful.
Pool Party and Early Espresso are the high lights for this card.  I used the Stampin UP! corner rounder for round the edges on all corners of the base and layer.  Next I used Whisper White Ink and White embossing powder with the Candy Conversations Stamp from last year - I love this stamp though so I think you may see it in use every year for me!  I used the small heart punch and punched out six hearts from scrap pieces of DSP - then the large heart punch to punch out three larger hearts from the DSP pack for In Colours.  The cute little bow is from the sale-a-bration set of ribbons and buttons that you can have for free!!!  during sale a- bration when you spend $60.  Now is the time to book your own party and get everything in the flyer!  So much fun stuff.
This last one from this class is my new fav technique -- the chalkboard technique - its easy and quite stunning when finished.  Some of the members thought my banner looked like underwear hanging on the line!  Blush!  I guess it does a bit.  I forgot to take a picture of the inside of this one but I used a really cute heart stamp around the inside of the card in Real Red and the saying was Non stampin UP!  The front says My favourite place.... and inside says "inside your hug"  too adorable for words.

I also had a chance to hang out with some friends this week and create and here is what I made!


I hope you have time to be inspired and create some fabulous cards for all of your loved ones!  I am looking forward to Sunday afternoon and my friend Carolyn is coming over so we can work on her Thank You cards for her Wedding!!!!  Big Congrats going out to her and Jim.  She deserves more happiness than anyone I know and wish them a lifetime plus of love and sharing.

Glittery Hugs!

Kathryne
AKA  
Crafty Kat

Friday, February 1, 2013

Sale-a-bration!

It's the most wonderful time of the year.......

SALE-A-BRATION!!!

Just check out the fabulous cool things you can get for free this year!  I love them all!  They are must haves for any and all stampers out there.  So there are more reasons then ever to host a party with your friends!

Message me today to book yours!


Glittery Hugs

Kathryne

Monday, January 14, 2013

First Brain Injury Class of the New Year

Happy Happy New Year! 

This is the first Brain Injury card class for 2013 and I am very excited to get back into the groove and so is my side kick my Crafty Kitten Presley!

We have been busy in the craft room designing and playing with the new products!  Exciting!

So the first card has a technique that I have been dying to try for quite awhile now  the chalkboard technique.  I am not sure why I have not done this before, but you can be sure you will be seeing some wide variations coming up in the next couple of months.

Of course these cards are simple on the skill level scale but beautiful all the same.

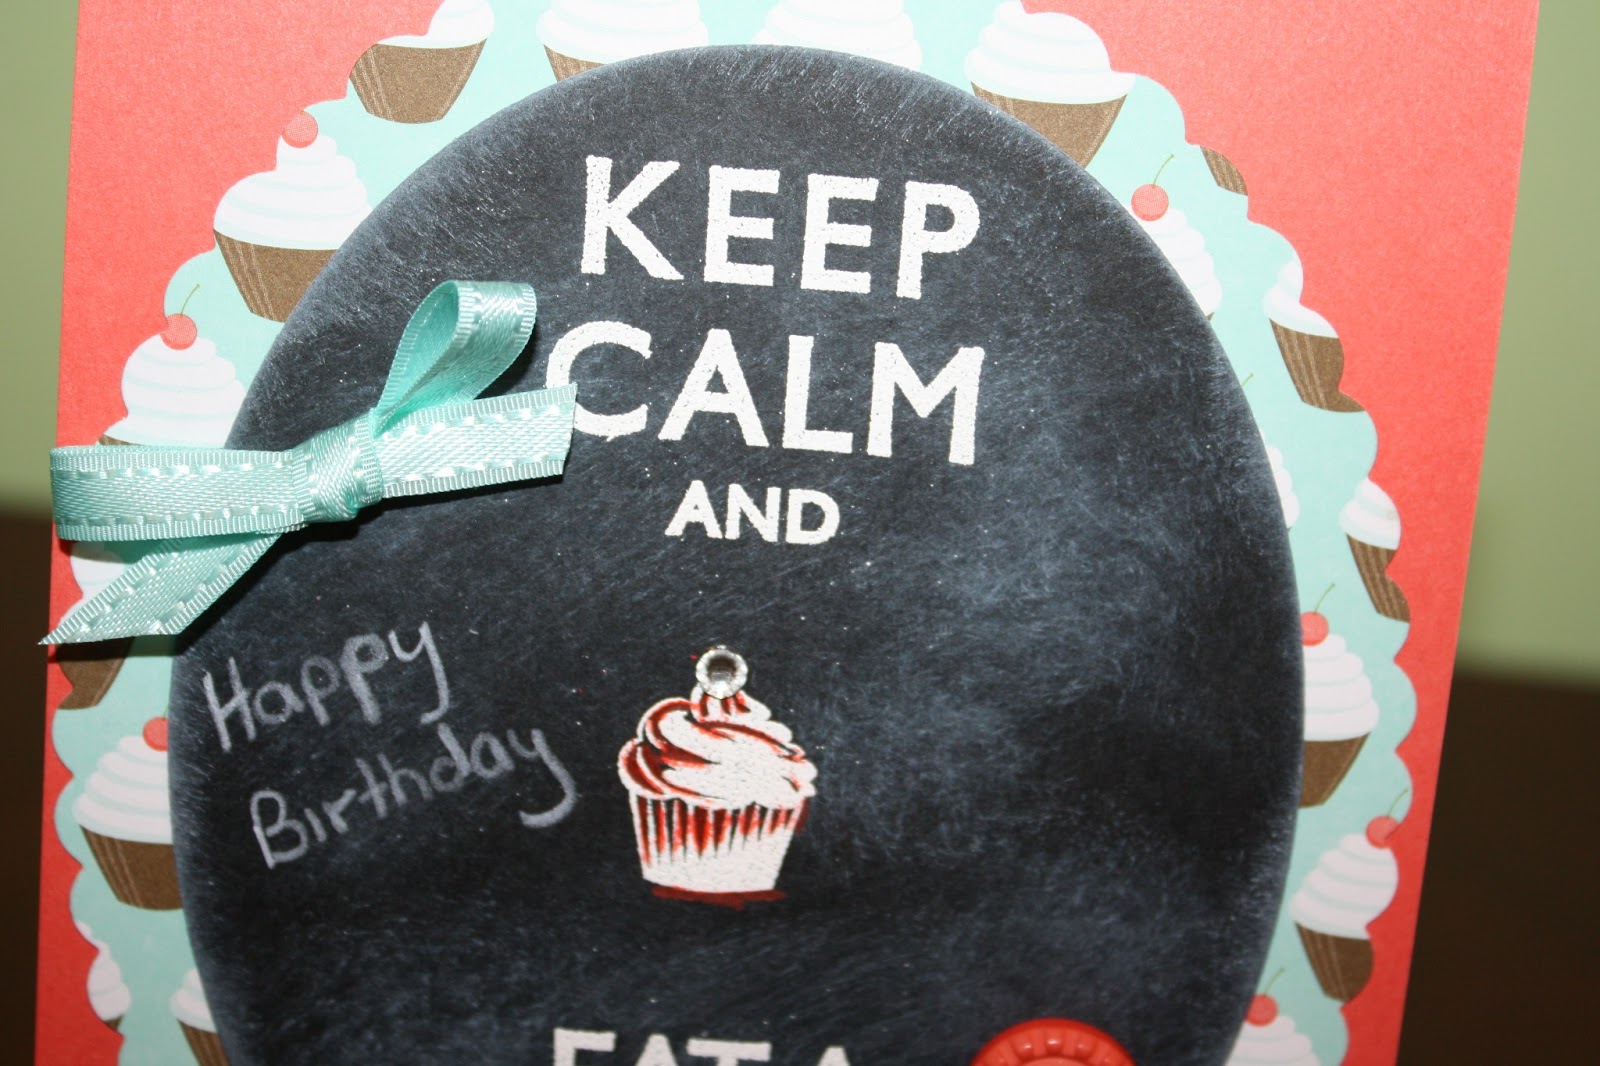
I love this stamp set.  You can see the "Keep Calm" sentiments in everything from clothing to art work and now in my creations.  You can get this one with your hostess dollars from Stampin UP!  

To create this card I used the new Ovals Famelits to cut a piece of Basic Black card stock for the chalkboard.  I used retired DSP with a cupcake pattern and the largest Oval that has a scallop to it and adds some wonderful detail .  

To achieve this simple chalk board effect I first used my embossing buddy all over the the black layer.  I arranged the stamps on my clear block to fit into the space of the "chalk board".  I used Versa Mark to stamp the sentiment and then used white embossing powder and the heat tool to set .  Set this aside and let it set some more.  Next I used a tissue and some Whisper White ink to create the "chalk dust" just smudge it around on the board.  I used the Stampin UP! coloured pencils to add some corresponding colour, in this case I chose the one that was closest to Calypso Coral which is the base of my card.
Next I added the words Happy Birthday with a white pencil crayon.  You can add more white hand drawn items at this point or you can add more stamps to enhance your image.

I used the sale-a-bration item!  EEEEK!! yes I said Sale-a-bration!  Ribbon and button kit.  Such pretty colours and so versatile.  Wait until you see the rest of the Sale-a-bration items available this year.  

The Ribbon is Pool Party and the button is Calypso Coral. You are definitely going to want this set.

In this picture you can see how the dust effect looks close up.

The Next card is a sympathy card.  Our community has been hit very hard so far this year with tragedy hitting us so it seemed appropriate that we do a sympathy card and unfortunately necessary.

This one I made for a friend to give to a family friend who tragically lost their daughter on New Year's Eve.  This is a stepped up version of what we  are doing in class this week.  This one starts with a base of Perfect plum then the next layer is Marina Mist.  The Marina Mist layer is stamped with the background stamp EnFrancais in Marina Mist Ink.  The next layer is Very Vanilla and I used Stampin Write markers in Perfect Plum, Old Olive and Marina Mist, to colour the large flower stamp from Elements of Style.  Next you "huff" or blow on the stamp to re-activate the ink.  I let it dry a minute then ran the panel through the Big Shot with the Elegant Embossing folder form the Holiday Catalogue, so pretty!.  Next I tore the edges of the panel in a random manner and sponged with Early Espresso ink.  I then used a scrap of Very Vanilla to Stamp the sentiment in Perfect Plum and punched it out with the oval punch, then sponged with Early Espresso ink.  The scallop oval was punched from from perfect plum as well.  The Very Vanilla layer was then popped up using dimensionals and the whole thing was adhered with tape runner.
At the top of the card I cut a small slit on the edge to allow me to thread the Basic Grey satin ribbon through to add some detail.  Inside I stamped the branch from Thoughts and prayers too and one of the sentiments in Perfect Plum.

The last touch was to add some dazzling diamonds to areas on the flowers to just give it a bit of shine.  
I have made this card before without tearing and in more masculine colours and used the lattice embossing folder and it also gives an amazing effect to the card.

Next Up!  Butterflies.  Everyone knows how much I love butterflies.  I can never get enough!  This card is full of texture and shine.
The base is Melon Mambo and it was run through the Big Shot with the Polka Dots embossing folder.  The Butterflies were cut out with the Sizzlet butterfly that cuts and embosses.  I layered the butterflies with Melon Mambo and Pink Pirouette.  The next layer is Pink Pirouette and was run through the Big Shot with the elegance embossing folder from the Holiday Catalogue.  The Whisper white layer was cut with the large scallop Edgelit and then embossed with Delicate Designs folders such a beautiful effect and, I am ashamed to say this is the first time I have used it.  The ribbon is from another site but is so pretty with its polka dots and scallops it just worked perfectly with my card.  And this card features another Sale-a-bration item.  The mini label punch is so stinking cute!  And there are matching stamps not only as a sale-a-bration item but also in the New Spring Catalogue!  Check them  out in the link to the side.
This next card is so adorable and I know my oldest son is going to love one for sure!  He is crazy for bee's and I try and make him only Bee Cards so this one made me think of him.

How cute is this one??!   I started with a Cherry Cobbler base and ran it through the Big Shot with the cool new Hexagon embossing folder.  Next I used the Adorning Accents Edgelit to trim the edge and create a cool effect for the stamp on the inside of the card.  I stamped two bees on Daffodil Delight with Staz on ink.  I fussy cut the bee and then just the wings on the second Bee and popped the wings up with dimensionals.  Of course I had to add some dazzling diamonds to the stripes of the bee.  I stamped the saying on Whisper White scraps and created a banner.  Then I used a scrap of Daffodil delight to add a highlight to the banner.

The inside panel was cut the same size as the base and I stamped the bees in Staz on.  The sentiment inside was first stamped in Daffodil Delight and then off set slightly in Staz on.

I added some cute Black Gingham ribbon to finish it off.


I hope you enjoyed today's post and tutorial!

Glittery Hugs,

Kathryne